
Before we could build the customer’s accessory dwelling unit, we first had to create enough flat space to accommodate it. This would require pushing back a massive slope of dirt and keeping it at bay with a retaining wall. Thankfully, this is something that we have experience with.
A retaining wall is designed to hold back soil and prevent erosion on sloped or uneven terrain. It can also be used to create level areas in your yard, manage water runoff, or enhance your landscape’s appearance. This project requires a bit of everything. Given Southern California’s unique climate and soil conditions, it’s essential we approach this project with the right knowledge and techniques.
There are several types of retaining walls that are commonly used, including:
- Gravity Walls: Rely on their mass to resist the pressure of the soil behind them. Often made from concrete or stone.
- Cantilever Walls: Use a slab and footing to leverage the weight of the soil against the wall.
- Anchored Walls: Secured with cables or rods anchored into the soil for additional support.
- Segmental Retaining Walls: Made from interlocking blocks, they are flexible and easy to install.
For this project we’ll need a cantilever wall, but before we could build it we first would have to engage with our architect and engineer to design the structure and draw up plans to be submitted to the city for review and approval. We started with a thorough assessment of the site, considering soil type, drainage patterns, and the wall’s height and length. We ran soil tests to help determine the stability of the ground and whether additional measures, like drainage systems, are needed. Ultimately, the process involved structural engineering, and soils and topographic reports. Thankfully, this is also something we have experience with and quickly procured the appropriate permit.

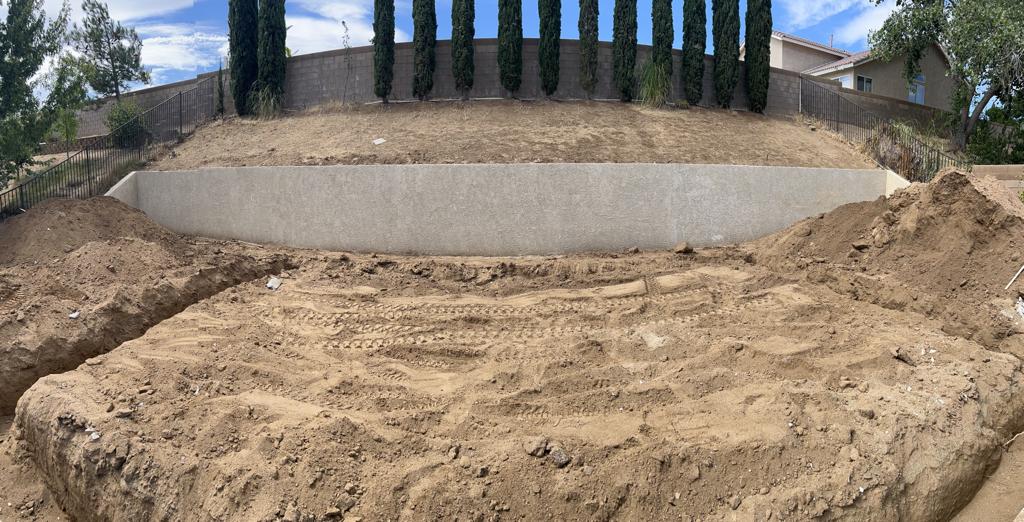
In order for our 5-foot tall wall to hold back the hill, the footings would need to have a heel of 2 feet and a toe of 1.5 feet, with an overall thickness of 24 inches. Of course, all of this would first require a significant amount of grading and trenching. We cleared the area where the wall was to be built, removing vegetation, rocks, and debris, and excavated the soil to create a trench for the wall’s foundation.
A solid foundation is crucial for stability. For most retaining walls, a base layer of crushed gravel or crushed stone is used to provide drainage and prevent shifting. The base should be level and compacted to ensure a stable wall. For our cantilever wall we poured concrete for the base and wall sections, using forms to shape the concrete, and reinforcing with steel rebar as needed.Proper drainage is essential to prevent water pressure from building up behind the wall, which can cause instability, so we installed a drainage pipe at the base of the wall, and used gravel to facilitate water flow.


The first inspection was required when trenches were ready for concrete and all of the required steel is tied in place. A second inspection was required when the first horizontal bar and all vertical bars were in place but not grouted. We passed both inspections and proceeded to build the wall, installing two-sided timber formwork around the rebar. Then it was time to pour the cement.


Once the cement has dried, we backfill behind the wall with gravel and soil, compacting it in layers to reduce settling while leaving space for proper drainage. Then we removed the formwork to reveal a fully functional retaining wall, then applied stucco to complete the look.


Building a retaining wall in Southern California involves careful planning, proper materials, and adherence to local regulations. Whether you need a gravity, cantilever, or segmental wall, understanding the unique needs of your site and incorporating effective drainage are key to a successful project. We’re here to help!
Next Chapter: Underground Work